

As the holidays approach, the kitchen becomes a hub of creativity and joy, especially for the little ones.
Kids’ Table Masterpiece: Easy Snowman Oreo Balls bring a whimsical touch to your festive gatherings.
These delightful treats are as fun to make as they are to eat, encouraging kids to get involved in holiday preparations.
With their creamy, chocolatey flavor and adorable snowman design, they’re sure to be the highlight of any celebration.
Whether you’re looking for a simple dessert idea or a fun family activity, these Snowman Oreo Balls are the perfect choice.
Let’s dive into the magic of creating these charming holiday treats.
Contents
- The History and Cultural Significance
- Recipe Overview
- Nutritional Information (per serving)
- Essential Equipment Guide
- Ingredients
- Preparation Methods
- Step 1: Prepare Oreos
- Step 2: Mix with Cream Cheese
- Step 3: Form the Balls
- Step 4: Melt the Chocolate
- Step 5: Coat the Balls
- Step 6: Decorate the Snowmen
- Step 7: Chill the Snowmen
- Step 8: Serve and Enjoy
- Critical Timing and Temperature Guide
- Pro Tips for Kids’ Table Masterpiece:
- Troubleshooting Common Issues
- Variations and Regional Differences
- Food Science Behind the Recipe
- Frequently Asked Questions
- Serving and Presentation Guide
The History and Cultural Significance
• Kids’ Table Masterpiece: traces its origins to the United States, where it was originally created as a fun holiday treat for children.
• The dish evolved over decades as different flavors of Oreos and decorating techniques emerged, eventually becoming the beloved version we know today.
• In American culture, this dish traditionally appears at holiday gatherings, symbolizing joy and creativity.
• While many variations exist across different regions, the authentic version maintains a whimsical snowman appearance that sets it apart from imitations.
Recipe Overview
Nutritional Information (per serving)
Essential Equipment Guide
Food Processor: Essential for crushing the Oreos into a fine crumb, which is crucial for the right texture. A rolling pin and a ziplock bag can be an alternative, though it may not achieve the same consistency.
Mixing Bowl: Important for combining the crushed Oreos with cream cheese evenly. Look for a medium-sized bowl that allows for easy mixing.
Microwave-safe Bowl: Needed for melting chocolate efficiently without burning. Ensure it’s microwave-safe to handle high temperatures and distribute heat evenly.
Ingredients
For the Base
|
| Amount | Ingredient | Notes |
|---|---|---|
| 36 pieces | Oreo cookies | crushed into fine crumbs |
| 8 ounces | cream cheese | softened, binds the mixture |
For the Decoration
| Amount | Ingredient | Notes |
|---|---|---|
| 12 ounces | white chocolate | melted, for coating |
| 24 pieces | mini chocolate chips | for eyes |
| 12 pieces | orange candy-coated chocolates | for noses |
Preparation Methods
Crushing: Use a food processor to pulse the Oreo cookies into fine crumbs. This step ensures a smooth mixture that holds together well.
Melting Chocolate: Melt white chocolate in short bursts in the microwave, stirring frequently to prevent scorching and achieve a smooth consistency.
Rolling: Roll the mixture into uniform balls by using the palms of your hands. This technique helps in achieving an even shape and size.
Step 1: Prepare Oreos

Place the Oreo cookies in a food processor.
Pulse until the cookies are finely crushed.
Ensure there are no large pieces remaining.
This will help in achieving a smooth texture for the balls.
Step 2: Mix with Cream Cheese

Transfer the Oreo crumbs to a mixing bowl.
Add the softened cream cheese.
Mix until the ingredients are well combined.
The mixture should be smooth and evenly mixed.
Step 3: Form the Balls
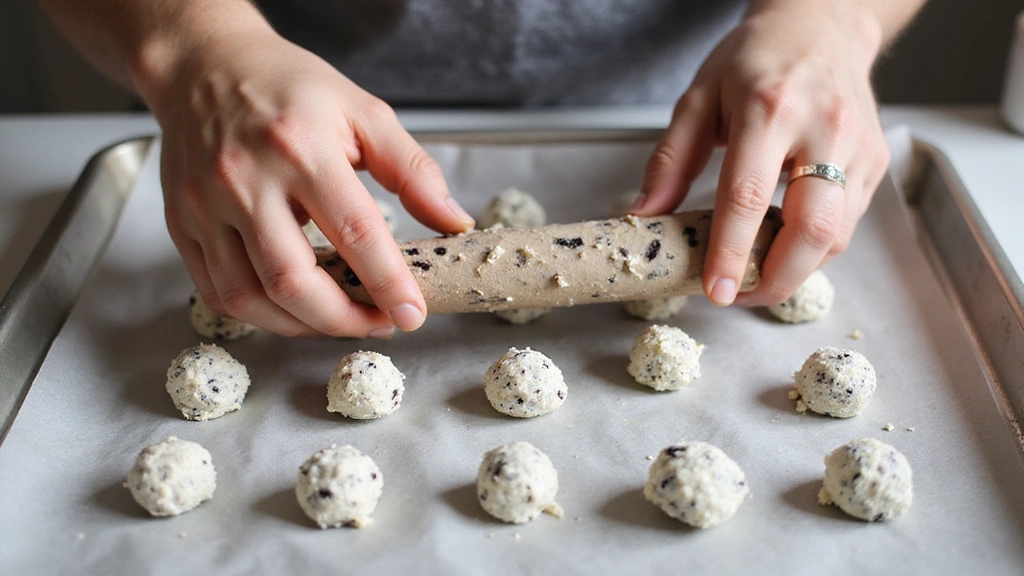
Scoop tablespoon-sized amounts of the mixture.
Roll them into balls using your hands.
Ensure the balls are uniform in size for even coating.
Place them on a lined tray.
Step 4: Melt the Chocolate
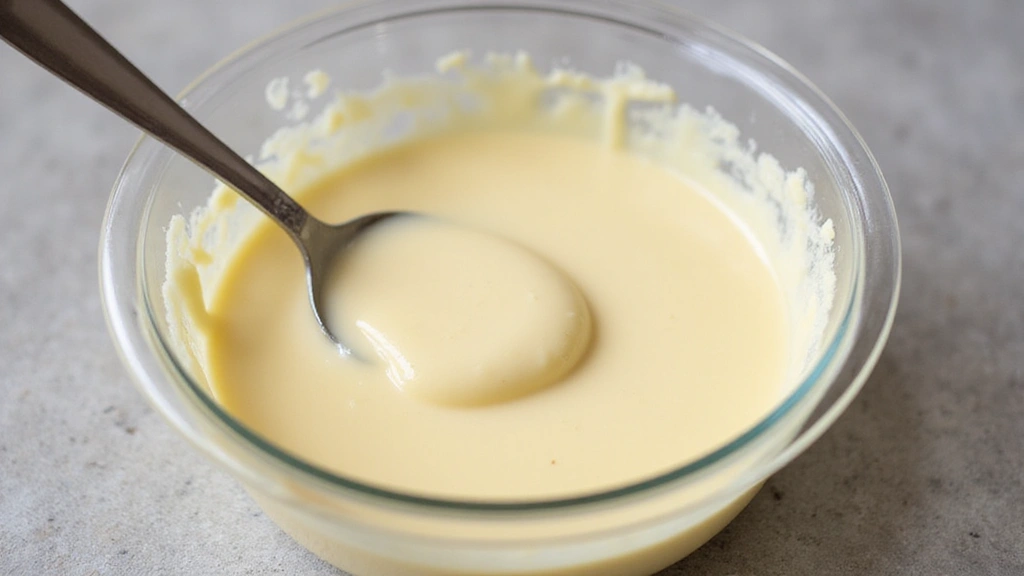
Place white chocolate in a microwave-safe bowl.
Microwave in 30-second intervals, stirring each time.
Continue until the chocolate is completely melted.
Avoid overheating to prevent clumping.
Step 5: Coat the Balls
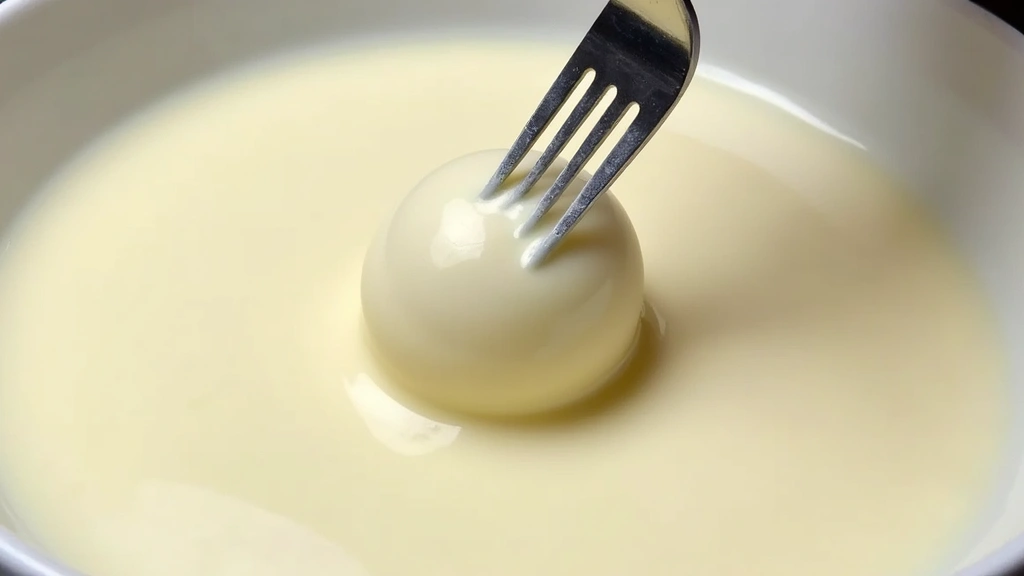
Dip each Oreo ball into the melted chocolate.
Use a fork to lift and let excess chocolate drip off.
Place the coated ball back on the tray.
Ensure an even coating for a smooth appearance.
Step 6: Decorate the Snowmen
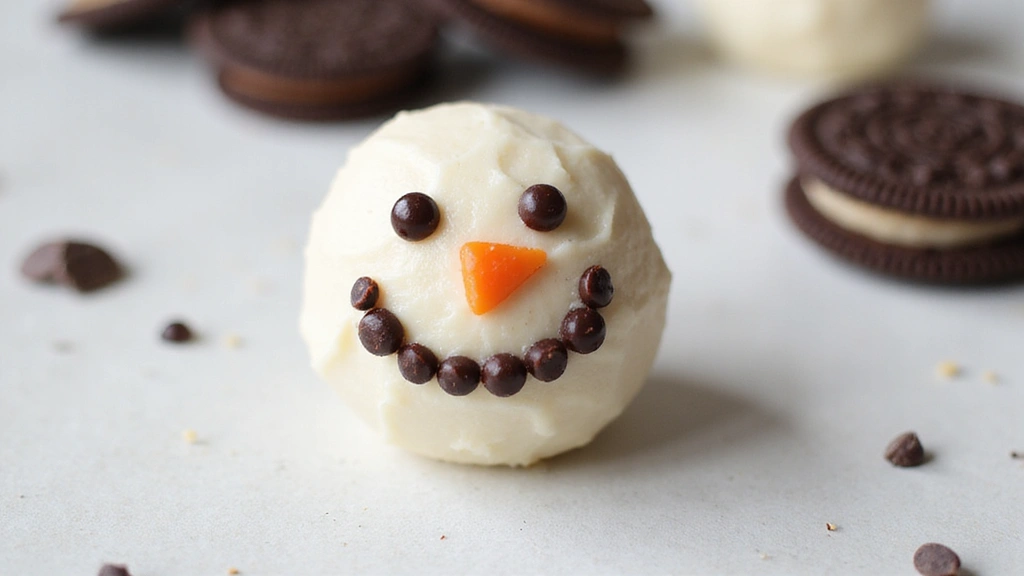
While the chocolate is still wet, press mini chocolate chips into the front for eyes.
Add an orange candy-coated chocolate for the nose.
Work quickly before the chocolate sets.
This will create the snowman’s face.
Step 7: Chill the Snowmen
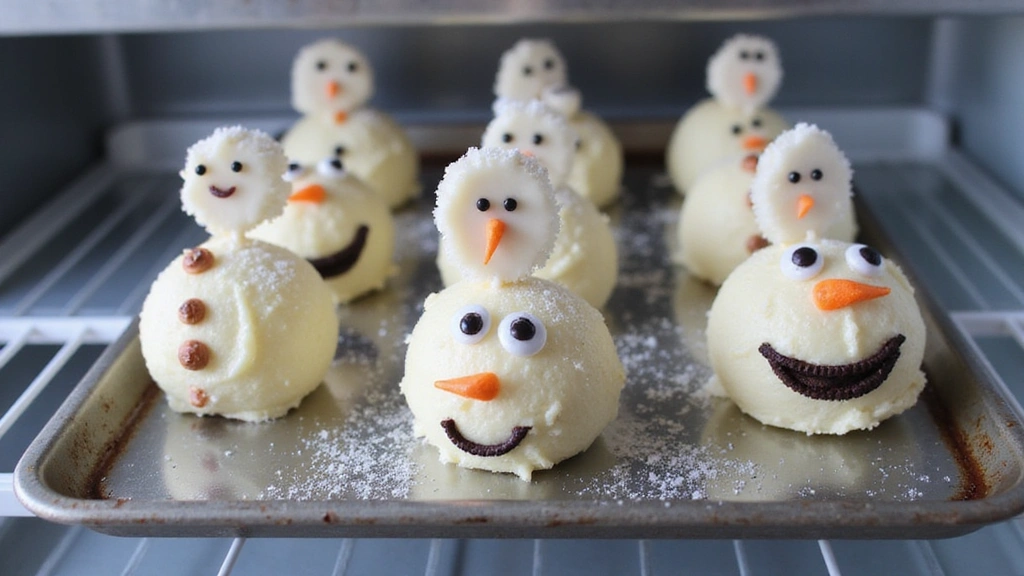
Place the decorated Oreo balls into the refrigerator.
Chill for at least 30 minutes.
This sets the chocolate coating firmly.
Ensure they are not touching to maintain shape.
Step 8: Serve and Enjoy
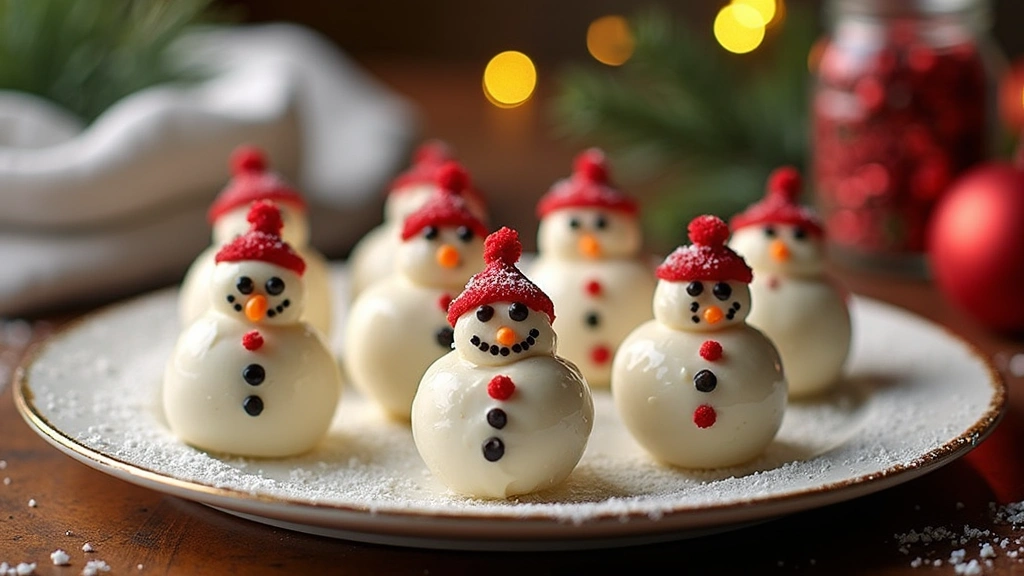
Remove the chilled snowman Oreo balls from the fridge.
Arrange them on a festive platter for serving.
Enjoy these delightful treats with friends and family.
Their playful appearance will charm everyone.
Critical Timing and Temperature Guide
Melting Chocolate: Microwave in 30-second intervals at medium power, stirring in between. Overheating can cause the chocolate to seize, making it unusable.
Chilling Oreo Balls: Refrigerate for at least 30 minutes. They should feel firm to the touch before serving. Avoid freezing as it can cause texture changes.
Mixing Ingredients: Mix the Oreo crumbs and cream cheese until completely smooth. Lumps can lead to uneven texture in the final product.
Pro Tips for Kids' Table Masterpiece:
• Ingredient Selection: Use high-quality white chocolate for the coating. Cheaper chocolates may not melt smoothly and can affect the appearance and taste.
• Preparation Secret: Adding a pinch of salt to the mixture can enhance the chocolate flavor without making the dessert salty.
• Temperature Management: Ensure the cream cheese is fully softened before mixing. This helps achieve a smooth, cohesive mixture.
• Texture Enhancement: Crush Oreo cookies to a very fine texture for the best consistency. Larger pieces can disrupt the smoothness of the balls.
• Flavor Layering: Adding a splash of vanilla extract to the mixture can deepen the flavor profile and complement the chocolate.
• Make-Ahead Strategies: Prepare the Oreo balls up to a day in advance and store them in the fridge. Coat and decorate them just before serving for the freshest appearance.
• Restaurant-Quality Finishing Touches: Dust a little edible glitter over the snowmen for a festive sparkle that elevates your presentation.
• Equipment Optimization: Use a double boiler for melting chocolate if you don't have a microwave. It provides more control over the melting process.
Troubleshooting Common Issues
• Chocolate Seizing: This occurs when water comes into contact with melted chocolate. Ensure all equipment is dry. If it happens, add a teaspoon of vegetable oil to smooth it out.
• Uneven Coating: If the chocolate is too thick, it may not coat evenly. Thin it by adding a small amount of coconut oil or shortening.
• Soft or Sticky Balls: This may happen if the cream cheese is too soft. Chill the mixture before rolling into balls to firm it up.
• Crumbly Texture: Over-processing the Oreos can remove too much moisture. Process until just fine enough to bind with the cream cheese.
• Chocolate Not Setting: Ensure your fridge is cold enough. If the coating doesn’t set, try placing them in the freezer briefly, but not for long periods.
Variations and Regional Differences
• Mint Chocolate Variation: Add a few drops of mint extract to the cream cheese mixture and use mint-flavored Oreos for a refreshing twist.
• Peanut Butter Style: Substitute half of the cream cheese with peanut butter for a nutty flavor, and use a chocolate coating instead of white chocolate.
• Spicy Holiday Version: Add a pinch of cinnamon and nutmeg to the Oreo mixture for a spiced holiday flavor, reminiscent of gingerbread.
• Traditional Italian Style: Incorporate crushed biscotti instead of Oreos and add a splash of amaretto to the mixture for an almond-flavored twist.
Food Science Behind the Recipe
• Emulsification: Understanding how cream cheese binds with Oreo crumbs through emulsification helps achieve the smooth texture crucial for rolling.
• Crystallization: Proper melting and cooling of chocolate is essential to achieve a glossy, smooth coating due to controlled crystallization.
• Thermal Conductivity: The role of temperature in setting the chocolate coating can be better managed by understanding how cold surfaces speed up the process.
Frequently Asked Questions
What's the most common mistake people make when preparing Snowman Oreo Balls? Overheating the chocolate, which can make it seize and become unusable.
Can I use different flavored Oreos? Yes, you can experiment with different Oreo flavors to create unique variations of the snowman balls.
How do I store the finished Oreo balls? Store them in an airtight container in the refrigerator for up to a week.
Why is my chocolate coating cracking? This can happen if the coating sets too quickly. Ensure the balls are not too cold when coating.
Can I freeze the Oreo balls? Freezing is not recommended as it can change the texture. Refrigeration is the best storage method.
Do I need to use a food processor? While a food processor is best for even crumbs, you can use a rolling pin and ziplock bag as an alternative.
How can I make them more festive? Use colored candy melts for the coating or add edible glitter for extra holiday cheer.
What if I don't have mini chocolate chips? You can use small candy eyes or cut chocolate pieces to size for creating the snowman’s face.
Serving and Presentation Guide
• Traditional Presentation: Arrange the snowman Oreo balls on a white platter surrounded by coconut flakes to resemble snow.
• Festive Display: Serve them on a tiered cake stand decorated with holiday ornaments for a centerpiece-worthy presentation.
• Individual Servings: Place each snowman Oreo ball in a decorative cupcake liner to make serving easy and hygienic.
• Themed Party Setup: Incorporate them into a winter wonderland-themed dessert table with complementary decorations and treats.
Conclusion
Creating Kids' Table Masterpiece: Easy Snowman Oreo Balls is a delightful holiday activity that brings joy to the kitchen.
Their simple ingredients and fun assembly make them a perfect project for kids and adults alike.
Let these charming snowman treats be a part of your holiday tradition, sparking creativity and festive spirit.
Gather your little helpers and enjoy the magic of making these delightful holiday treats together.