
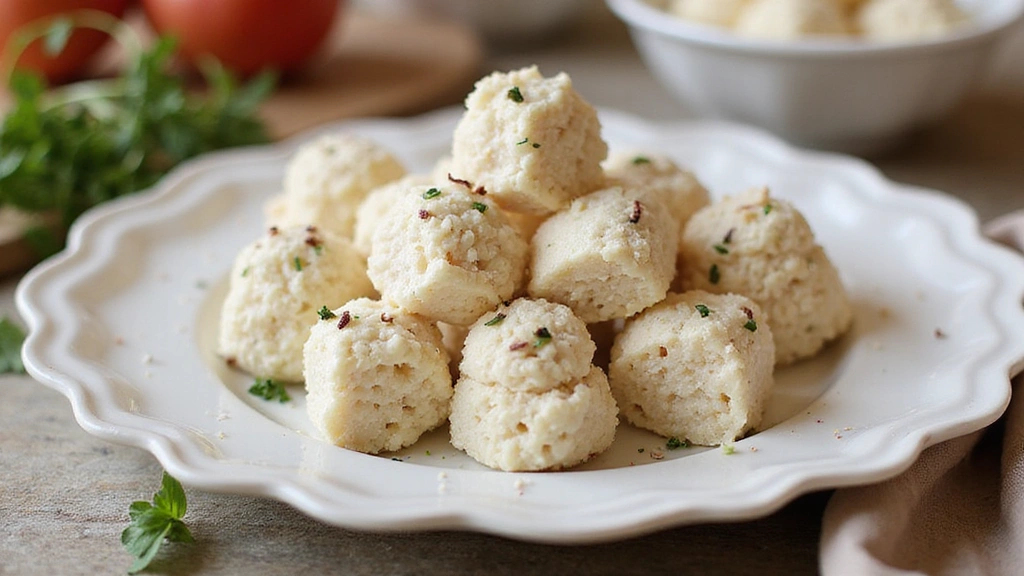
As the snowflakes gently blanket the world outside, what better way to capture the essence of winter than with our delightful Snowman Rice Krispie Treats?
These charming treats are perfect for bringing a bit of whimsy to your holiday gatherings, combining sweetness and fun in every bite.
The delightful crunch of the Rice Krispie base pairs perfectly with the creamy marshmallow, creating a flavor profile that both kids and adults adore.
Inspired by the joy and magic of the winter season, this easy-to-make recipe ensures that creating adorable snowmen is just as enjoyable as eating them.
Whether you’re crafting these with the family or as a solo kitchen adventure, expect smiles and laughter to accompany every step.
Get ready to embrace the winter wonderland spirit with these irresistible treats!
The History and Cultural Significance
• Winter Wonderland Treat: traces its origins to the early 20th century in the United States, where it was originally created by homemakers looking for festive holiday treats.
• The dish evolved over decades as marshmallows became widely available, eventually becoming the beloved version we know today.
• In American culture, this dish traditionally appears at winter holiday gatherings, symbolizing the joy and creativity of the season.
• While many variations exist across different regions, the authentic version maintains its playful snowman shape that sets it apart from imitations.
Recipe Overview
Nutritional Information (per serving)
Essential Equipment Guide
Non-stick Saucepan: Essential for melting marshmallows and butter without sticking, ensuring a smooth mixture. Alternatives include a heavy-bottomed pot, but make sure it distributes heat evenly to prevent burning.
Wooden Spoon: Ideal for stirring the marshmallow mixture as it won’t melt or heat up like metal. A silicone spatula can also work, but ensure it is heat-resistant.
Baking Sheet: This is crucial for shaping and cooling the treats. A non-stick or greased baking sheet prevents sticking and makes for easy cleanup.
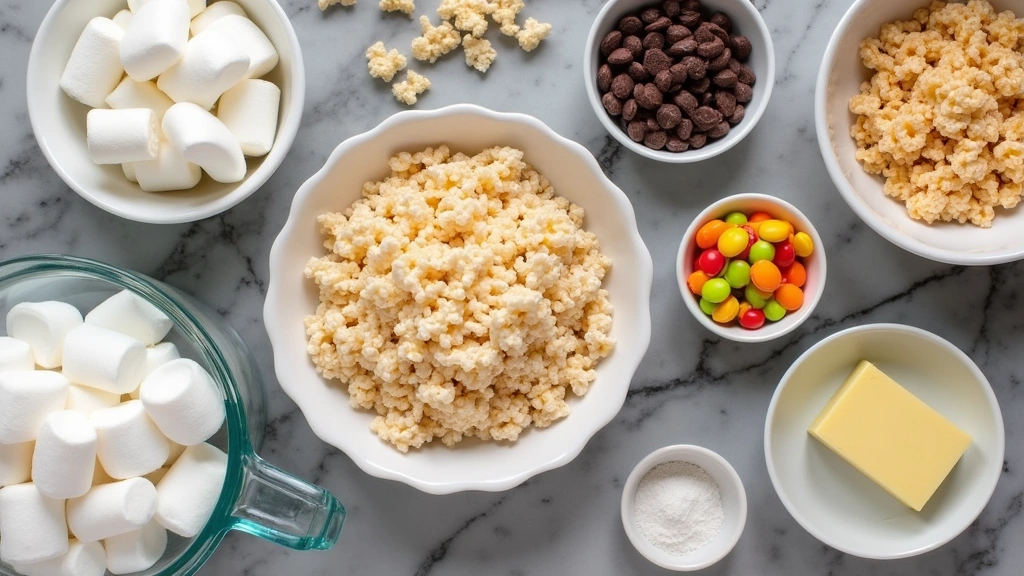
Ingredients
For the Base
|
| Amount | Ingredient | Notes |
|---|---|---|
| 3 tablespoons | butter | melted, adds richness |
| 4 cups | mini marshmallows | melted, acts as the binding agent |
| 6 cups | Rice Krispies cereal | provides the crunchy texture |
Decorations
| Amount | Ingredient | Notes |
|---|---|---|
| 1 cup | white chocolate chips | melted, for coating |
| 24 miniature | chocolate chips | for the eyes |
| 12 orange candy-coated chocolates | for the noses | |
| 1 tube | black decorating gel | for the mouths |
Preparation Methods
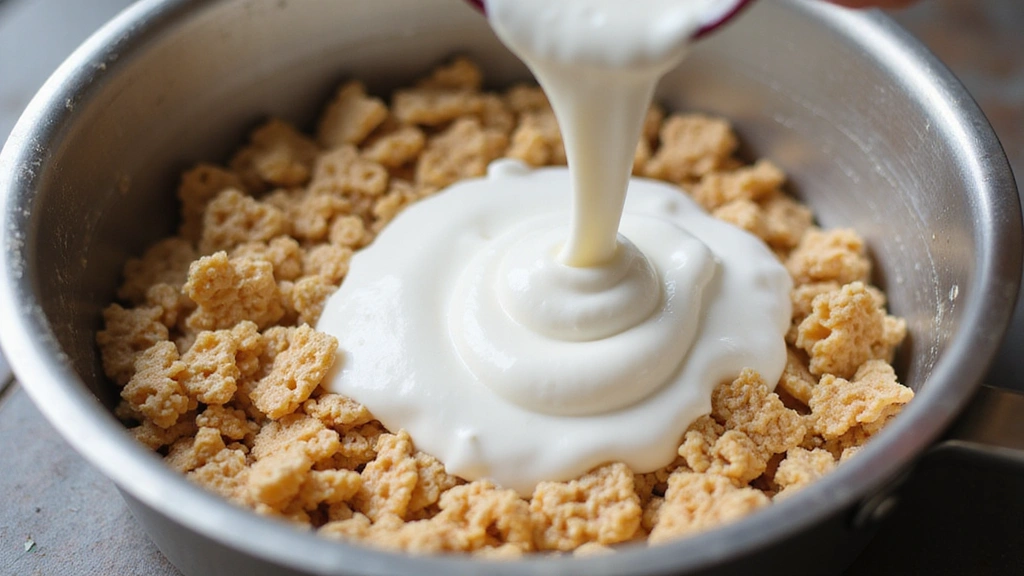
Melting Marshmallows: Gently heat butter and marshmallows over low heat, stirring constantly to prevent sticking and burning. This technique ensures a smooth, creamy base for the Rice Krispies.
Shaping the Snowmen: Use slightly moistened hands to form the mixture into ball shapes, which helps prevent sticking and allows for easier molding.
Decorating Details: Use a piping bag or a small spoon to apply the melted chocolate and gel for intricate detailing, ensuring precision and clean lines.
Step 1: Prepare Ingredients
Gather all ingredients and equipment.
Measure out the marshmallows, butter, and Rice Krispies cereal.
Ensure all decorations are ready for use.
Set up your workspace for easy access to everything you need.
Step 2: Melt Butter
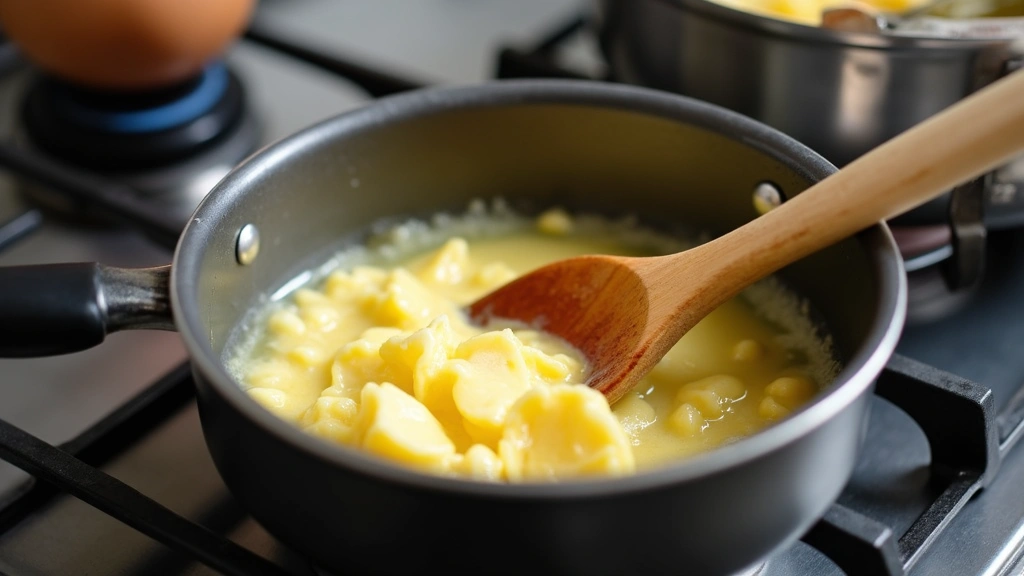
Place the non-stick saucepan over low heat.
Add the butter and allow it to melt completely.
Stir occasionally to prevent burning.
Look for a smooth, evenly melted consistency.
Step 3: Add Marshmallows
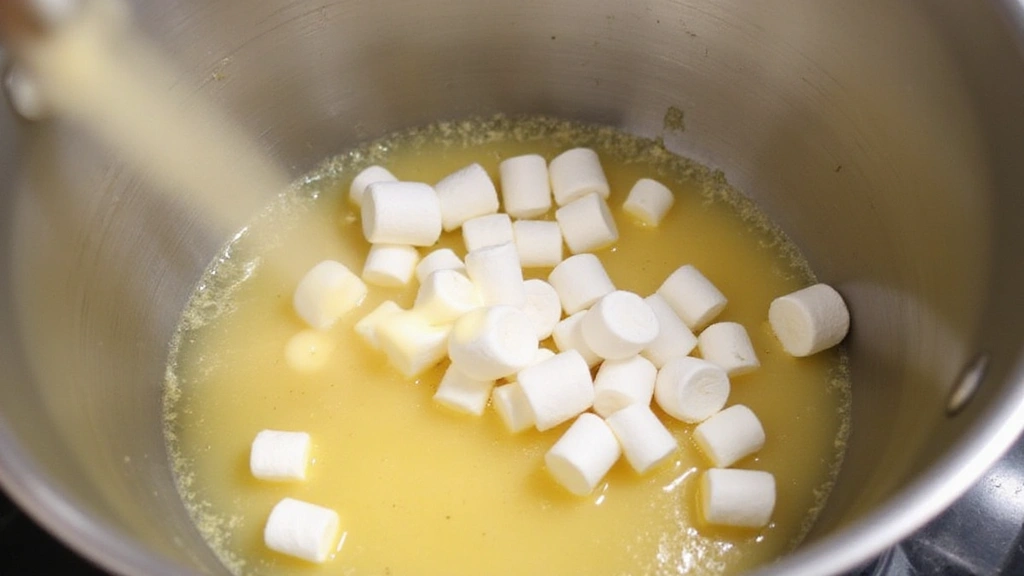
Once the butter is melted, add the mini marshmallows.
Stir continuously as they begin to melt into the butter.
Ensure the mixture is smooth without any lumps.
Keep the heat low to prevent burning.
Step 4: Incorporate Rice Krispies
Remove the saucepan from heat.
Quickly add the Rice Krispies cereal to the melted marshmallow mixture.
Stir until all the cereal is evenly coated.
Work quickly to ensure the mixture doesn't harden before shaping.
Step 5: Shape Snowmen
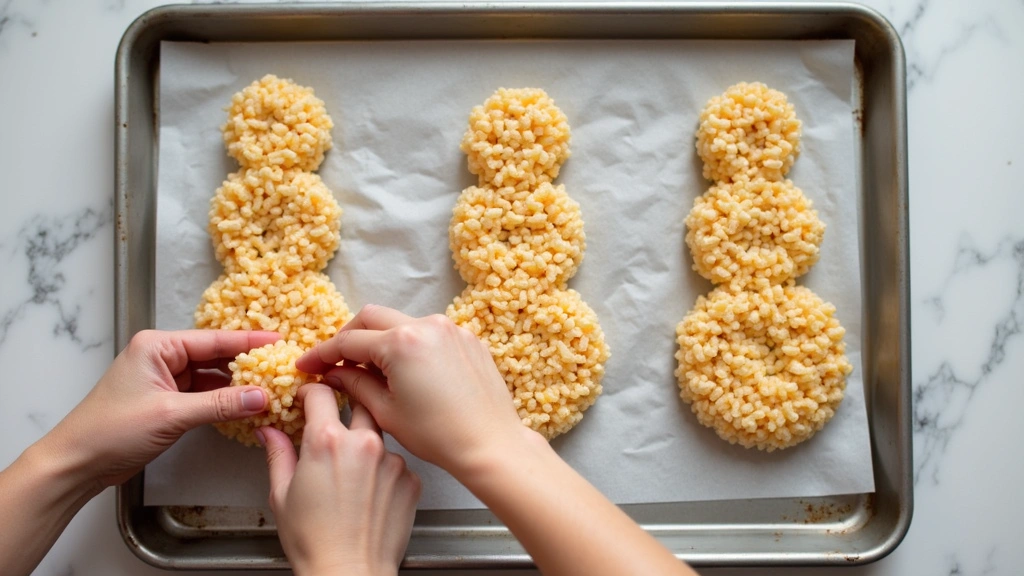
Slightly moisten your hands to prevent sticking.
Form small balls from the mixture, using about a handful for each.
Press gently to shape each into a snowman form.
Place shaped snowmen onto a greased baking sheet to cool.
Step 6: Melt White Chocolate
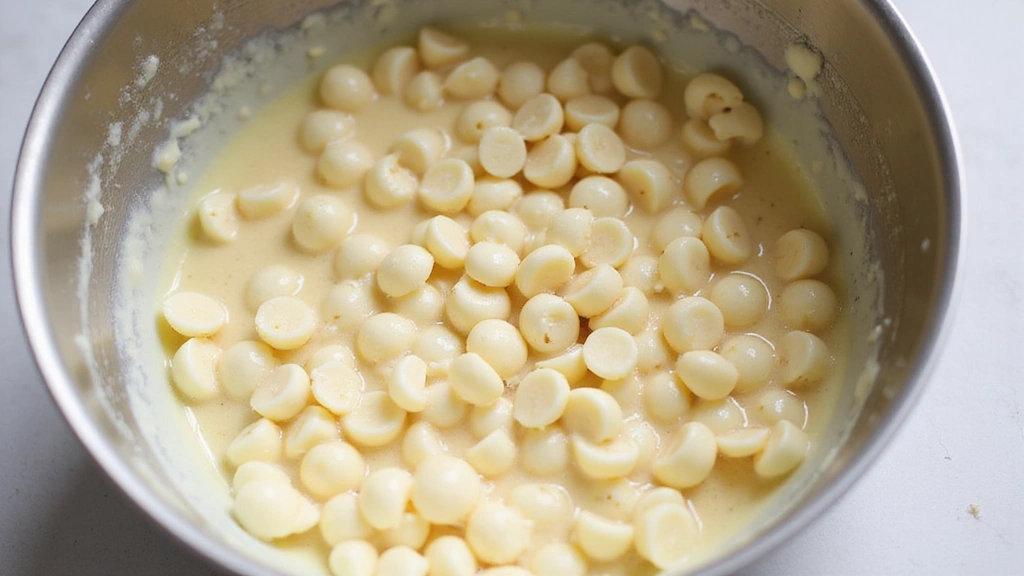
Use a microwave or double boiler to melt the white chocolate chips.
If microwaving, heat in 30-second intervals, stirring in between.
Ensure the chocolate is smooth and free of lumps.
Be careful not to overheat, which can cause seizing.
Step 7: Decorate Snowmen
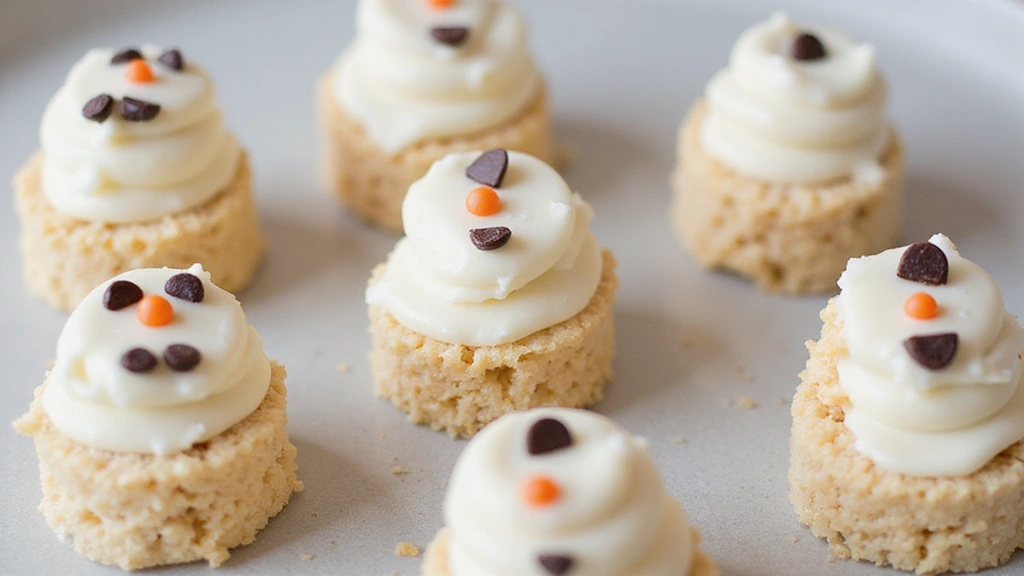
Use a spoon or piping bag to apply melted white chocolate onto the snowmen.
Place miniature chocolate chips for eyes and orange candies for noses.
Use black decorating gel to draw mouths.
Work carefully for clean, precise decorations.
Step 8: Allow to Set

Place the decorated snowmen in a cool area or refrigerate.
Let them set for about 15-20 minutes until the chocolate hardens.
Check that decorations are securely attached before serving.
Enjoy your whimsical winter treats!
Critical Timing and Temperature Guide
Melting Marshmallows: Melt over low heat, stirring constantly until smooth. Avoid high heat to prevent burning, and look for a creamy texture without lumps.
Shaping and Cooling: Shape snowmen while the mixture is still warm to ensure it sticks together. Cool on a baking sheet at room temperature or refrigerate for quicker setting.
Chocolate Coating: Melt chocolate gently, ensuring it reaches a smooth, liquid state. Avoid overheating, which causes seizing, and apply quickly before it cools.
Pro Tips for Winter Wonderland Treat:
• Ingredient Selection: Use fresh marshmallows for the best melting consistency; stale marshmallows may not melt smoothly.
• Preparation Secret: Adding a pinch of salt to the marshmallow mixture can enhance the overall flavor by balancing sweetness.
• Temperature Management: Ensure all ingredients are at room temperature for easier mixing and shaping.
• Texture Enhancement: Gently press the cereal mixture when shaping to maintain a light, airy texture.
• Flavor Layering: Incorporate a few drops of vanilla extract into the marshmallow mixture for added depth of flavor.
• Make-Ahead Strategies: Prepare the base and shape the snowmen a day in advance, storing them in an airtight container to decorate later.
• Restaurant-Quality Finishing Touches: Dust a tiny amount of edible glitter on the snowmen for a magical, sparkling effect.
• Equipment Optimization: Use a silicone baking mat instead of parchment paper to prevent sticking and ensure even cooling.
Troubleshooting Common Issues
• Mixture Too Sticky: If the mixture is sticking excessively to your hands, lightly moisten your hands with water or cooking spray before shaping.
• Snowmen Falling Apart: Ensure the marshmallow mixture is well-incorporated with the cereal and shaped while warm to maintain structure.
• Chocolate Not Sticking: Make sure the snowmen are completely cool before applying decorations, or the chocolate may slide off.
• Burnt Marshmallow: Use low heat and stir constantly to prevent marshmallows from burning during melting.
• Chocolate Seizing: Melt chocolate slowly and avoid any contact with water, which can cause it to seize and become grainy.
• Decorations Slipping: Gently press decorations into the chocolate before it sets to ensure they adhere properly.
Variations and Regional Differences
• Classic American Version: Typically uses vanilla-flavored marshmallows and basic Rice Krispies cereal for a traditional taste.
• European Twist: Incorporates dark chocolate for coating instead of white, providing a richer flavor profile.
• Asian Influence: Adds matcha powder to the marshmallow mixture for a subtle green hue and unique flavor.
• Holiday Special: Includes dried cranberries or raisins mixed into the base for a festive touch and added texture.
Food Science Behind the Recipe
• Emulsification: The combination of butter with marshmallows creates an emulsion that binds the cereal together without becoming too sticky.
• Gelatinization: The gelatin in marshmallows helps form the structure of the treats, allowing them to hold their shape once cooled.
• Sugar Crystallization: Proper melting of marshmallows prevents sugar crystallization, ensuring a smooth, creamy texture rather than a gritty one.
Frequently Asked Questions
What's the most common mistake people make when preparing Snowman Rice Krispie Treats? Overheating the marshmallow mixture, which can cause it to harden too quickly and become difficult to shape.
Can I use large marshmallows instead of mini marshmallows? Yes, but be sure to cut them into smaller pieces for even melting.
How can I make these treats vegan? Substitute regular marshmallows with vegan marshmallows and use dairy-free butter.
Do these treats need to be refrigerated? No, they can be stored at room temperature, but refrigeration can help them set faster.
Can I add flavors to the base mixture? Absolutely, adding vanilla or almond extract can enhance the flavor.
Why is my chocolate seizing? This typically happens if water comes into contact with the chocolate. Ensure all equipment is dry.
How long can I store these treats? They can be stored in an airtight container for up to a week without losing freshness.
Serving and Presentation Guide
• Traditional Presentation: Serve the snowmen standing upright on a festive platter decorated with sprigs of holly or pine.
• Creative Platter: Arrange the snowmen in a circle to mimic a snowball fight scene, adding edible snowflakes for effect.
• Individual Wrapping: Wrap each snowman in cellophane tied with a ribbon for a delightful party favor.
• Themed Centerpiece: Incorporate the treats into a larger winter-themed centerpiece with candles and faux snow.
Conclusion
Embrace the spirit of the season with these charming Snowman Rice Krispie Treats.
They're sure to bring joy and laughter to any holiday gathering.
With their delightful taste and whimsical appearance, they're a perfect winter treat.
Give this recipe a try and create some magic in your own kitchen!